この記事はこんな人におすすめ!
フローチャートを使用して記事の概要説明をしようと思ったけど、なんかタイムラインっていう表現方法もあるっぽい(;´・ω・)どうやって書いてるんだろう?
そんな人におすすめの記事です。
実は私のことなんですけどね(笑)
WordPressブログの紹介記事を見ていると、中には「タイムライン」というフローチャートの代用とも言えそうな表現で、導入手順を紹介している記事があります。
なんかカラフルで洒落てる印象もあって、記事に内容によって自分も使い分けられるようになりたい!と思ったので調べて実践してみました。
参考にさせてもらったのは以下の記事です。
HTMLとCSSでタイムラインデザイン!WordPressでショートコードも! | ぽんひろ.com (ponhiro.com)
インターネットの世界で何がすごいって、こうゆう便利なツールになるソースコードをスゴい先達たちが惜し気もなく公開してるところですよね。
ただ、申し訳ないことに、途中出てきた分からない専門用語の解説や深堀りなんかは全てすっ飛ばします(笑)PCやネットワーク関連の知識は調べ始めたら多すぎてワケわからなくなってしまうのでwなにか不具合があった時に検証するスタンスです。
とりあえずこの記事を参考に実践してみたら、こんな事ができるようになるよ!、というような簡易な内容に絞って今から紹介していきます。
※自分はフローチャートでいいや!という人がいたら以下の記事で気軽に使える手法を紹介しているのでおススメです!
WordPressブログで手軽にフローチャートを作成する方法!(WP Mermaidの導入) - かえる主任ブログ (kaeru-chief.com)
WordPressブログでタイムラインを使用した手順説明をする方法のフローチャート
まずはWordPressブログでタイムラインを使用した手順説明をする方法のフローチャートを示します。
事前準備1:Font Awesomeの導入
1つ目の事前準備として、WordPressプラグインの「Font Awesome」をインストールして有効化します。
WordPressホームから プラグイン → インストール済みプラグインをクリックします。
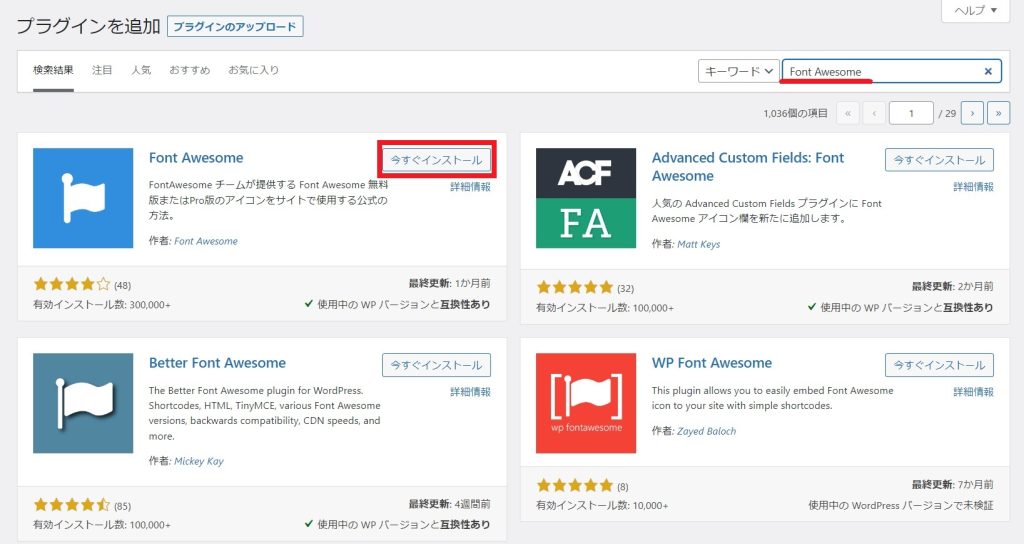
画面右上の検索欄に「Font Awesome」と入力すると、左上に表示されるので赤枠で示す「今すぐインストール」をクリックして下さい。
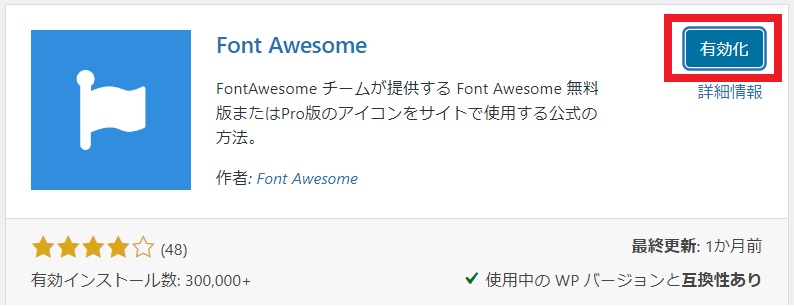
インストール出来たらボタンが切り替わるので、今度は「有効化」をクリックします。
これでFont Awesomeの導入は完了です!
※設定とか諸々ちゃんとやらなくて大丈夫?と心配になるかもしれませんが、今回のタイムラインに使用する範囲であればインストールして有効化するだけで何の問題もありません!サクッと終わらせて次に行きましょう!
事前準備2:Cocoonテーマのバックアップを作成
2つ目の準備として、Cocoonテーマのバックアップを作成します。
プラグインとかで自動バックアップを取っている人もいると思うのですが、レンタルサーバーから直接コピーして持ってきた方が安心できます。
レンタルサーバーにログインしてサーバーファイルから「themes」フォルダを丸ごと自分のPCへコピーしちゃって下さい。
WordPress設定画面からCSSコードをコピペ
まずは以下のCSSコードを全部コピーして下さい!
/*********************************
* タイムライン
*********************************/
.ptimeline-wrap{
    margin:0 auto 2rem;
}
.ptimeline-wrap .ptimeline{
    padding:0 !important;
    list-style:none !important;
}
.ptimeline-wrap .ptimeline-label {
    padding: 3px 0 0 2px;
    color: #aaa;
    font-size: 12px;
    font-weight: 500;
}
.ptimeline-wrap .ptimeline-title {
    font-size: 1.1em;
    font-weight: bold;
    line-height: 1.5;
    color:#00bfff;
}
.ptimeline-wrap .ptimeline-main {
    margin-top: 0.5em;
    padding: 0 0 1.5em;
    font-size: 0.9em;
    line-height: 1.8;
    border-bottom: dashed 1px #ddd;
    color:#555;
}
.ptimeline-wrap .ptimeline-main img{
  display:block;
  margin:1em auto;
}
.ptimeline-wrap .ptimeline-item {
    position: relative;
    padding: 0 0 1em 1.5em !important;
    margin-bottom:0 !important;
    border:none;
}
.ptimeline-wrap .ptimeline .ptimeline-item:before {
    content: "";
    width: 3px;
    background: #eee !important;
    display: block;
    position: absolute;
    top: 25px;
    bottom: -3px;
    left: 5px;
}
.ptimeline-wrap .ptimeline-item:last-child:before{
    content:none;
}
/*********************************
* タイムライン マーカー
*********************************/
.ptimeline-wrap .ptimeline-marker{
    display: block;
    position: absolute;
    content: "";
    top: 6px;
    left: 0;
    width: 14px;
    height: 14px;
    border-radius: 50%;
    border: solid 3px #00bfff;
}
.ptimeline-wrap .ptimeline-item:first-child .ptimeline-marker,.ptimeline-wrap .ptimeline-item:last-child .ptimeline-marker{
    background:#00bfff;
}
/*四角 */
.ptimeline-wrap .square .ptimeline-marker{
    border-radius: 0;
}
/* アイコン*/
.ptimeline-wrap .icon .ptimeline-item .ptimeline-marker{
    content:unset;
    border:none !important;
    background:none !important;
}
.ptimeline-wrap .icon .ptimeline-item .ptimeline-marker:before{
    font-family: "Font Awesome 5 Free";
    top: -1px;
    left: 0;
    position:absolute;
    font-weight:bold;
    font-size:16px;
    line-height:1;
    color:#00bfff;
}
.ptimeline-wrap .icon .ptimeline-item:first-child .ptimeline-marker,.ptimeline-wrap .icon .ptimeline-item:last-child .ptimeline-marker{
    background:none !important;
}
/* 画像*/
.ptimeline-wrap .tl-img .ptimeline-item .ptimeline-marker{
    content:unset;
    border:none !important;
    background:none !important;
}
.ptimeline-wrap .tl-img .ptimeline-item .ptimeline-marker:before {
    content:"";
    display:inline-block;
    background-image:url(ここに画像URL); /* 画像1番目*/
    background-size:contain;
    background-repeat:no-repeat;
    width:40px;
    height:40px;
    position: relative;
    top: -4px;
    left: -2px;
}
.ptimeline-wrap .tl-img li:nth-of-type(2) > .ptimeline-marker:before{
    background-image:url(ここに画像URL) !important; /* 画像2番目*/
}
.ptimeline-wrap .tl-img li:nth-of-type(3) > .ptimeline-marker:before{
    background-image:url(ここに画像URL) !important; /* 画像3番目*/
}
.ptimeline-wrap .tl-img li:nth-of-type(4) > .ptimeline-marker:before{
    background-image:url(ここに画像URL) !important; /* 画像4番目*/
}
.ptimeline-wrap .tl-img li:nth-of-type(5) > .ptimeline-marker:before{
    background-image:url(ここに画像URL) !important; /* 画像5番目*/
}
.ptimeline-wrap .tl-img .ptimeline-item {
    padding: 0 0 1em 3em !important;
}
.ptimeline-wrap .tl-img .ptimeline-item:before {
    top: 30px;
    left: 15px;
}
/*********************************
* タイムライン カラー
*********************************/
/* ピンク */
.ptimeline-wrap .pink .ptimeline-title{
    color:#f7bcbc !important; /* タイトル色 */
}
.ptimeline-wrap .pink .ptimeline-main{
    color:#555 !important; /* コンテンツ色 */
}
.ptimeline-wrap .pink .ptimeline-marker{
    border: solid 3px #f7bcbc !important; /* マーカー色 */
    color:#f7bcbc; /* アイコン色 */
}
.ptimeline-wrap .pink .ptimeline-item:first-child .ptimeline-marker,.ptimeline-wrap .pink .ptimeline-item:last-child .ptimeline-marker{
    background:#f7bcbc; /* マーカー色(最初と最後)*/
}
.ptimeline-wrap .pink .ptimeline-item .ptimeline-marker:before{
    color:#f7bcbc !important; /* アイコン色 */
}
/*イエロー*/
.ptimeline-wrap .yellow .ptimeline-title{
    color:#fdc44f !important; /* タイトル色 */
}
.ptimeline-wrap .yellow .ptimeline-main{
    color:#555 !important; /* コンテンツ色 */
}
.ptimeline-wrap .yellow .ptimeline-marker{
    border: solid 3px #fdc44f !important; /* マーカー色 */
    color:#fdc44f; /* アイコン色 */
}
.ptimeline-wrap .yellow .ptimeline-item:first-child .ptimeline-marker,.ptimeline-wrap .yellow .ptimeline-item:last-child .ptimeline-marker{
    background:#fdc44f; /* マーカー色(最初と最後)*/
}
.ptimeline-wrap .yellow .ptimeline-item .ptimeline-marker:before{
    color:#fdc44f !important; /* アイコン色 */
}
/*グリーン*/
.ptimeline-wrap .green .ptimeline-title{
    color:#2fcdb4 !important; /* タイトル色 */
}
.ptimeline-wrap .green .ptimeline-main{
    color:#555 !important; /* コンテンツ色 */
}
.ptimeline-wrap .green .ptimeline-marker{
    border: solid 3px #2fcdb4 !important; /* マーカー色 */
    color:#2fcdb4; /* アイコン色 */
}
.ptimeline-wrap .green .ptimeline-item:first-child .ptimeline-marker,.ptimeline-wrap .green .ptimeline-item:last-child .ptimeline-marker{
    background:#2fcdb4; /* マーカー色(最初と最後)*/
}
.ptimeline-wrap .green .ptimeline-item .ptimeline-marker:before{
    color:#2fcdb4 !important; /* アイコン色 */
}
※上記コードは以下ブログから転記させてもらっています。
HTMLとCSSでタイムラインデザイン!WordPressでショートコードも! | ぽんひろ.com (ponhiro.com)
CSSコードをコピーしたらWordPressホーム画面に移ってください。
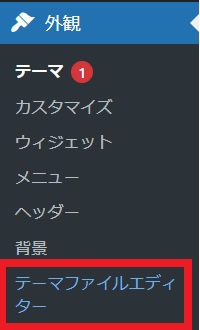
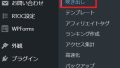
左側メニューの 外観 → テーマファイルエディター をクリックして下さい。
そうすると以下のようなテーマ編集画面が表示されます。
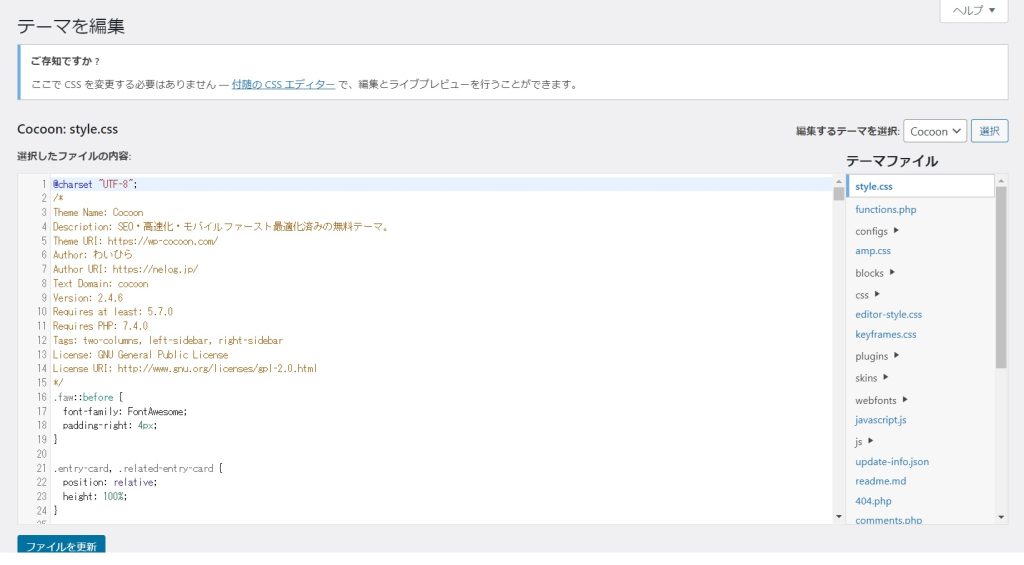
右側のテーマファイルで「style.css」が選択されていることを確認し、「選択したファイルの内容」欄を一番下の行までスクロールしてください。
一番下の行にカーソルを合わせて先程コピーしたCSSコードを貼り付けましょう!
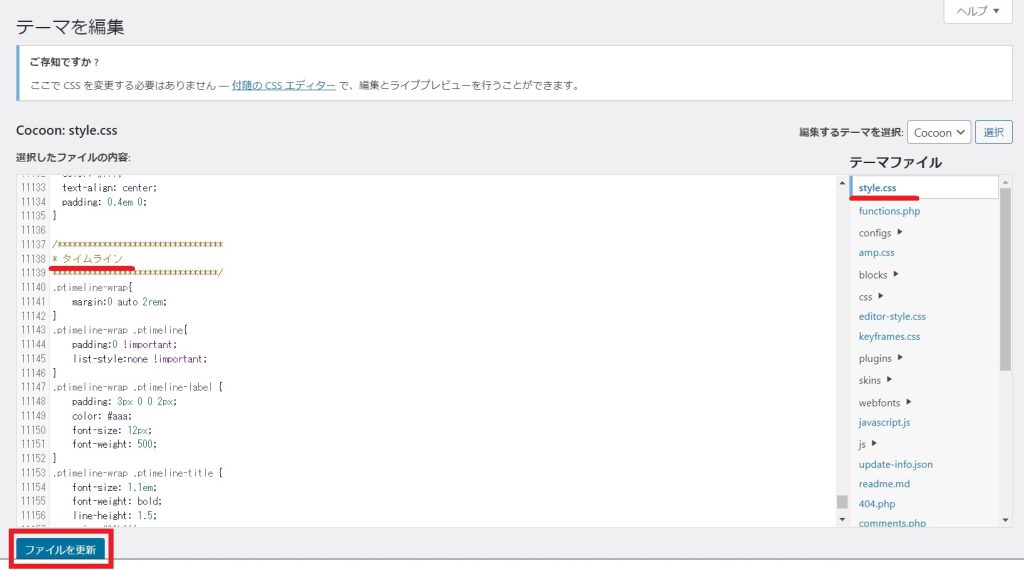
貼り付いたことを確認したら「ファイルを更新」をクリックして下さい。
以下のような「ファイル編集に成功しました」というメッセージが出てくれば成功です!

WordPress設定画面からPHPコードをコピペ
次の手順も先程のCSSの時とほとんど一緒です。
まずは以下のPHPコードをコピーしてください!
//timelineショートコードコンテンツ内に余計な改行や文字列が入らないように除外
if ( !function_exists( 'remove_wrap_shortcode_wpautop' ) ):
function remove_wrap_shortcode_wpautop($shortcode, $content){
  //tiショートコードのみを抽出
  $pattern = '/\['.$shortcode.'.*?\].*?\[\/'.$shortcode.'\]/is';
  if (preg_match_all($pattern, $content, $m)) {
    $all = null;
    foreach ($m[0] as $code) {
      $all .= $code;
    }
    return $all;
  }
}
endif;
//タイムラインショートコード
add_shortcode('ptimeline', 'tl_shortcode');
if ( !function_exists( 'tl_shortcode' ) ):
function tl_shortcode( $atts, $content = null ){
extract( shortcode_atts( array(
    'color' => null,
    'marker' => null,
    'icon' => null,
  ), $atts ) );
  $content = remove_wrap_shortcode_wpautop('ti', $content);
  $content = do_shortcode( shortcode_unautop( $content ) );
  if ( $icon ):
   $tag .= '<style type="text/css">.ptimeline-wrap .'.$icon.' .ptimeline-item .ptimeline-marker:before{ content:"\\'.$icon.'";}</style>';
  endif;
  $tag .= '<div class="ptimeline-wrap">'.
            '<ul class="ptimeline '.$color.' '.$marker.' '.$icon.'">'.
              $content.
            '</ul>'.
          '</div>';
  return apply_filters('timeline_tag', $tag);
}
endif;

//タイムラインショートコード中身
add_shortcode('ti', 'tl_item_shortcode');
if ( !function_exists( 'tl_item_shortcode' ) ):
function tl_item_shortcode( $atts, $content = null ){
  extract( shortcode_atts( array(
    'title' => null,
    'label' => null,
    'icon_item' => null,
  ), $atts ) );
  $content = do_shortcode( shortcode_unautop( $content ) );
  if ($icon_item):
   $tag .= '<style type="text/css">.ptimeline-wrap .ptimeline-item .'.$icon_item.':before{ content:"\\'.$icon_item.'" !important;}</style>';
  endif;
  $tag .= '<li class="ptimeline-item">'.
            '<div class="ptimeline-label">'.$label.'</div>'.
             '<div class="ptimeline-title">'.$title.'</div>'.
             '<div class="ptimeline-main">'.$content.'</div>'.
            '<div class="ptimeline-marker '.$icon_item.'"></div>'.
          '</li>';
  return apply_filters('timeline_item_tag', $tag);
}
endif;
※上記コードは以下ブログから転記させてもらっています。
HTMLとCSSでタイムラインデザイン!WordPressでショートコードも! | ぽんひろ.com (ponhiro.com)
PHPコードをコピーしたらWordPressホーム画面に移ってください。
左側メニューの 外観 → テーマファイルエディター をクリックして下さい。
テーマ編集画面が表示されるので、右側のテーマファイルの「functions.php」をクリックし、選択したファイルの内容が「Cocoon: functions.php」となったことを確認してください。
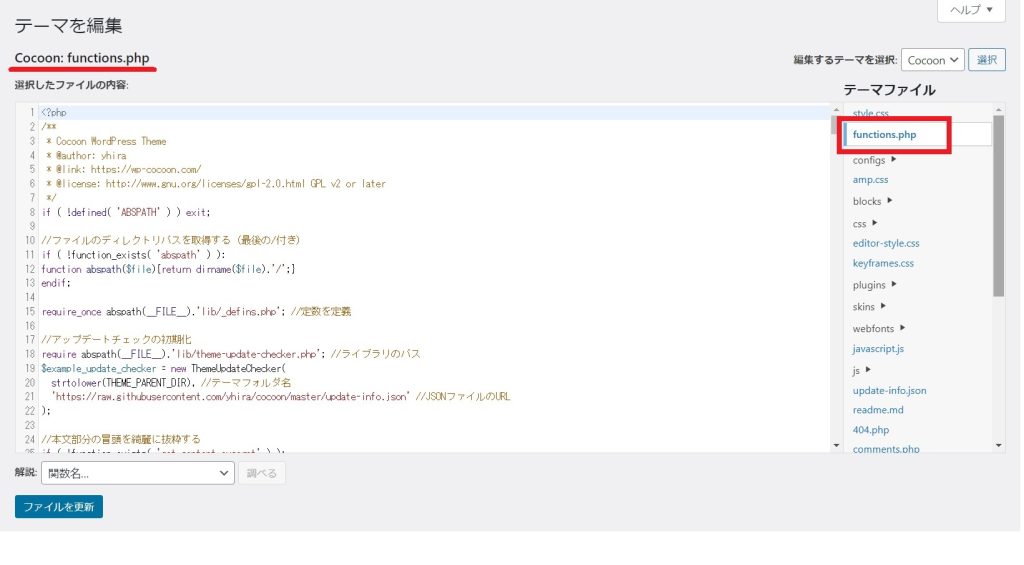
「選択したファイルの内容」欄で一番下の行までスクロールしてください。
一番下の行にカーソルを合わせたら、先程コピーしたPHPコードを貼り付けます!
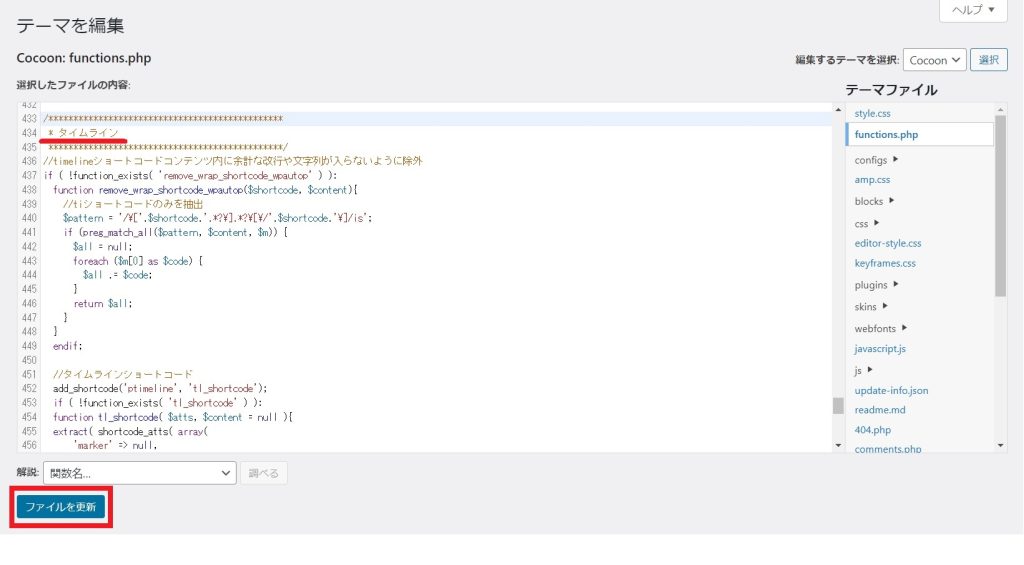
貼り付いたことを確認したら「ファイルを更新」をクリックして下さい。
以下のような「ファイル編集に成功しました」というメッセージが出てくれば成功です!
タイムラインのショートコードをコピペ
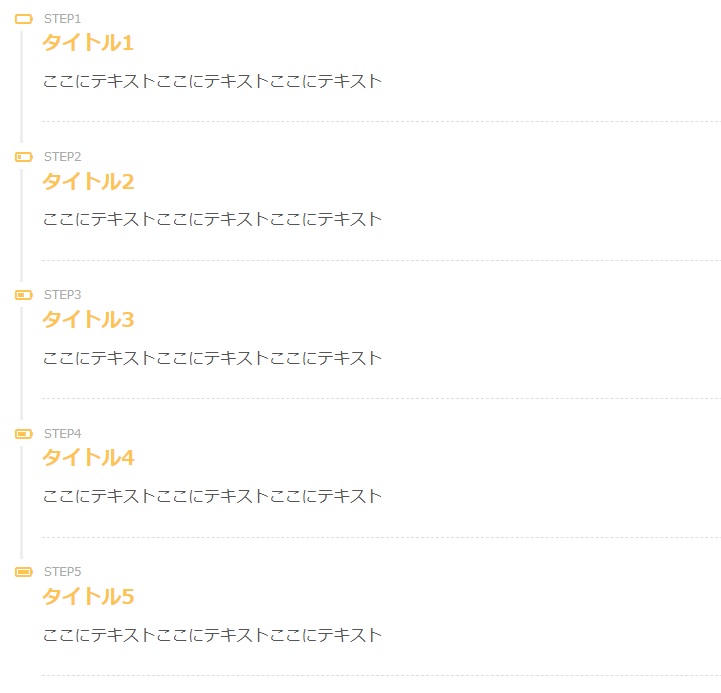
標準的なタイムライン(「〇」丸表示)
以下のショートコードをコピーします!
[ptimeline]
[ti label="STEP1" title="タイトル1"]ここにテキストここにテキストここにテキスト[/ti]
[ti label="STEP2" title="タイトル2"]ここにテキストここにテキストここにテキスト[/ti]
[ti label="STEP3" title="タイトル3"]ここにテキストここにテキストここにテキスト[/ti]
[ti label="STEP4" title="タイトル4"]ここにテキストここにテキストここにテキスト[/ti]
[ti label="STEP5" title="タイトル5"]ここにテキストここにテキストここにテキスト[/ti]
[/ptimeline]
WordPressホームに移って 投稿 → 新規追加 もしく記事一覧 をクリックして、記事編集画面を表示させます。
タイムラインを挿入したい場所で画面左上の「+」ボタンを押し、下の方にある「ショートコード」クリックします。

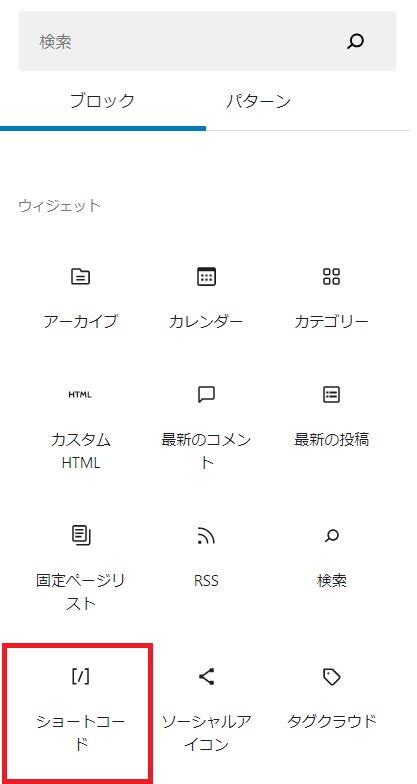
すると以下のような枠が現れます。この水色枠の中に先程コピーしたショートコードを貼り付けます。

そうすると、標準的なタイムラインが表示できるようになります!
実際に使う際は「STEP1」や「ここにテキスト」の箇所に適切な記入を行って作成しちゃってください!
[ptimeline]
[/ptimeline]
Font Awesomeと連携したタイムラインの作成方法
もちろん標準的なままでも十分に使えますが、使っていくうちにココを変えてみたい!という場面も出てきちゃいますよね!
ここではFont Awesomeを連携した場合の一例を紹介します。
例:
[ptimeline color="yellow" marker="icon"]
[/ptimeline]
使用したショートコードは以下の通りです。
[ptimeline color="yellow" marker="icon"]
[ti label="STEP1" title="タイトル1" icon_item="f244"]ここにテキストここにテキストここにテキスト[/ti]
[ti label="STEP2" title="タイトル2" icon_item="f243"]ここにテキストここにテキストここにテキスト[/ti]
[ti label="STEP3" title="タイトル3" icon_item="f242"]ここにテキストここにテキストここにテキスト[/ti]
[ti label="STEP4" title="タイトル4" icon_item="f241"]ここにテキストここにテキストここにテキスト[/ti]
[ti label="STEP5" title="タイトル5" icon_item="f240"]ここにテキストここにテキストここにテキスト[/ti]
[/ptimeline]
marker="icon"、icon_item="****"を使用していて、****にはFont Awesomeのコードを入力すればOKです!
まとめ
- 割と気軽にできる(30分程度。基本はコピペだけなので(笑))
- タイムラインを使用するにはWordPressの設定でCSSとPHPのソースコードを編集する必要がある
- ソースコードを編集するので万が一に備えてバックアップが必要
- Font Awesomeが無くてもシンプルなタイムラインは作成できる
- Font Awesomeがあったほうが編集の幅が広がって楽しいw
最後まで読んでくれて、ありがとうございました!
是非、ランキングへの協力をお願いします!

コメント